

Making covered buttons is a fun way to make stylish fastenings or features for all kinds of projects. You’ve taken time with your project, so why compromise with the buttons? It’s a great way to get a custom finish that really makes your project pop!
Cover buttons can be used for almost any project, from a lightweight cotton shirt to adding a feature to a headboard.
Making button fastenings and embellishments can be a great way of using up scrap fabric, especially with a bold contrast fabric! In the tutorial we’ll show you how to use metal and plastic button blanks, and make buttons with and without a press.
Here’s what you’ll need:
- Fabric offcuts from your project, or contrast fabric
- metal button blanks (or plastic)
- Scissors
- Cover button press (optional)
- fabric marker pen

Which cover buttons are best?
We sell both plastic and metal button blanks because our customers ask for both. Here’s how they compare:
Metal cover buttons
Metal blanks are essential if you are working with upholstery fabrics and furnishing fabrics. They are strong enough to hold a heavier fabric in place. We prefer to use metal cover buttons for dressmaking projects, and would always recommend metal for heavier fabrics like denim and drill. Metal self-cover blanks are stronger and sturdier, give a longer-lasting result, and won’t rust.
Plastic cover buttons
Plastic blanks are a cheaper option, and are much more light weight. These cover buttons work best for projects using lightweight fabric like a dress cotton or lawn. Heavier fabrics just won’t be held firmly in place and may come apart with use.
Both types of button blanks come in a range of sizes for all projects but we prefer to use metal blanks wherever we can. If you would like to make cover buttons in a light dressmaking fabric, a plastic blank would work – but a metal cover button is stronger and won’t rust in the wash.
How to make cover buttons with and without using a press
We like to use a simple hand press to make our cover buttons. We love this Prym button tool – you can buy it here. It’s a simple hand press that is small, easy to use. A press will give you a great result without a struggle! We use this Prym one ourselves.
Do you want to make your buttons without a tool? If you don’t have a button press and don’t want to buy one you can still get a good result. To find out how to make them by hand, click here to jump down the tutorial to make cover buttons without a tool .
To make cover buttons using a button tool
In the tutorials below we’ll show you how to make your own cover buttons with any fabric, using a button press. Our press is a universal cover button tool from Prym; you might have a different brand but if it looks similar it will work the same way.
Take a look at the video to see us using a press or jump down to the picture tutorial below!

1
Cut your fabric
Draw a circle on your fabric using the template from your kit. Cut it out and make sure it is big enough to fold over your blank with plenty to tuck in.
If you don’t have a template it might be an idea to make a test button first, to work out what size fabric you need.

2
Put fabric into the button maker
Wrap fabric neatly over the outside of the cover button and push it into the silicone half of the button maker. This will smooth and hold the fabric over the button so that you don’t have to. Fold the fabric in, trimming it if necessary.

3
Press the button together
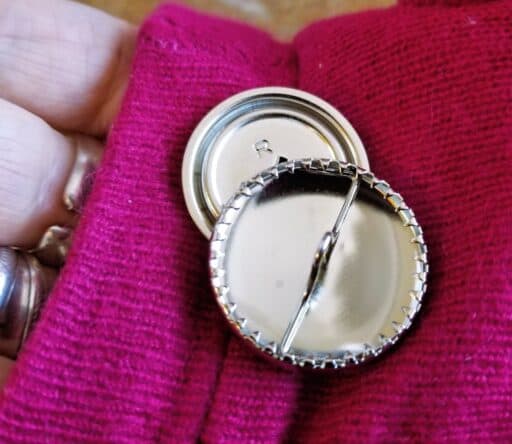
With your button in place, now fit the back plate over the fabric onto the front.
Use the hard plastic top of the button cover tool to push the back onto the front. You should hear it click firmly into place.
You have made a covered button!
Cover buttons without a button tool
1
Cut your fabric
This part is the same as using a button press. Cut your fabric into a small circle, but make sure it is big enough to fold over your button (if it is too big, you can always cut it down later).
It might be an idea to practise making a button first, to work out what size fabric you need.
2
Gather up the fabric
There are two ways you can do this, depending on whether you want to get out your needle and thread! Sewing a running stitch is a little bit fiddly but will give you a neater gather if you’re making cover buttons without a press.
Option 1 – For the smoothest finish: Sew a running stitch near the edge of your circle of fabric. Put the button onto the fabric and and gather it up before pressing the back into place. Use this method for plastic buttons.
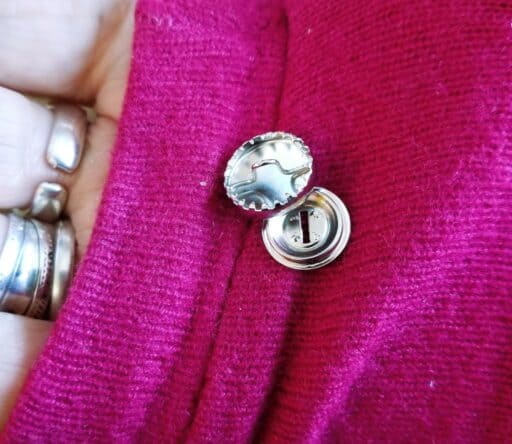
Option 2 – if you can’t find a needle!: gather the fabric as neatly as possible over the front of the metal button using lots of small folds so it catches in the teeth in the back. Press the button back into place. This method only works for metal buttons, because they have grippier teeth.
Check the back is in place nice and tightly, and your button is ready to use.
-
 Metal Cover Buttons 22mm pack of 5£ 3.10Order a Sample
 -
 Plastic Cover Buttons 29mm pack of 5£ 2.75Order a Sample
 -
Plastic Cover Buttons 22mm pack of 5£ 1.75Order a Sample
-
Plastic Cover Buttons 19mm pack of 5£ 1.25Order a Sample
-
 Prym Button Press For Cover Buttons£ 5.40Order a Sample
 -
 Metal Cover Buttons 19mm pack of 5£ 2.50Order a Sample
 -
 Metal Cover Buttons 15mm pack of 5£ 2.25Order a Sample
 -
 Metal Cover Buttons 29mm pack of 5£ 4.50Order a Sample
0 Comments